
ERC-20 Paymaster Tutorial
Learn how to pay gas fees with ERC-20 tokens
This tutorial extends the Get Started example to include paying for gas using an ERC-20 token.
You can also follow along to a video explanation, if that's your style.
① Start a New Project
Clone the example repository from Github.
git clone -b [email protected]:JohnRising/userOpExample.git
Enter the project directory, and install the dependencies.
cd userOpExample
npm install
② Set Configuration
Go to your Stackup dashboard and get an API key (or Paymaster URL) for Sepolia.
Remember: In production, these should be secrets.
const rpcUrl ="https://public.stackup.sh/api/v1/node/ethereum-sepolia";
const paymasterUrl = "https://api.stackup.sh/v1/paymaster/API_KEY";
③ Set the ERC-20 Paymaster
Scroll down to the paymasterContext field.
To send an ERC-20 sponsored transaction, you need to change the paymasterContext to the erc20token type. We will sponsor the transaction using the 6TEST token. The code should look like this:
  const paymasterContext = {
    type: 'erc20token',
    token: '0x3870419Ba2BBf0127060bCB37f69A1b1C090992B', // Ethereum Sepolia 6TEST token
  };
④ Approve the paymaster to withdraw the token
Call data contain the instructions that will be executed on-chain. In order to pay for gas, the sender needs to tell the ERC-20 token that the paymaster is approved to withdraw the tokens.
You can just add this to the callData of your user operation. The paymaster withdraws the token at the end of the user operation, so you don't need a separate transaction to approve the token.
This example approves the withdrawal of 1000 6TEST tokens (equivalent to $1000 in ETH). In production, it is much better practice to only approve the necessary amount of tokens.
const paymasterContract = "0x9D6AC51b972544251Fcc0F2902e633E3f9BD3f29";
const approvedWithdrawAmount = 1000000000;

const callTo = [token,
  // ... rest of the contracts you are calling
];

const callData = [
  erc20.interface.encodeFunctionData('approve', [paymasterContract, approvedWithdrawAmount]),
  // ... rest of your call data
];
⑤ Get 6TEST tokens
The 6TEST token can be minted directly to your smart contract address. The fastest way to do this is with an existing EOA and Etherscan.
-
Navigate to https://sepolia.etherscan.io/address/0x3870419Ba2BBf0127060bCB37f69A1b1C090992B#writeContract
-
Mint tokens to the
sender.- Connect to Etherscan
- Navigate to the
mintfunction - Paste the address of your new smart account into the
spenderfield - Enter a high amount of tokens in the
amountfield. The 6TEST token has six decimals and is equivalent to 1 USD, so make sure theamountis at least 10 million or so. - Click the Write button.
-
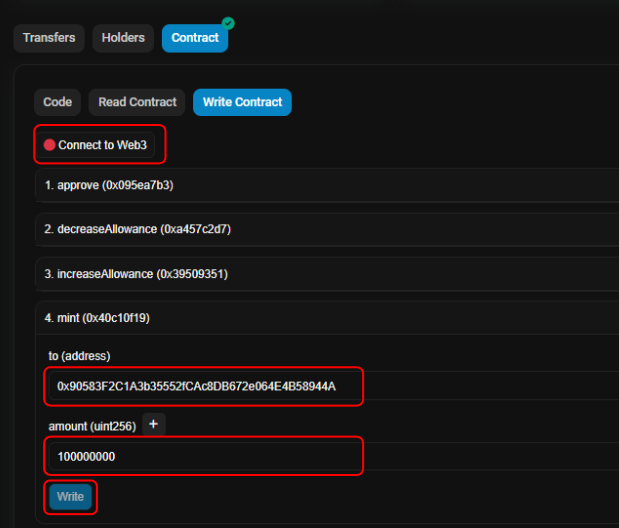
-
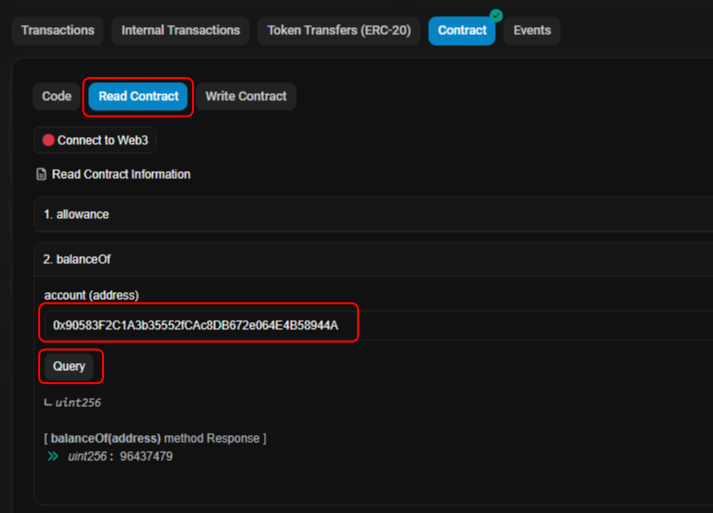
Check the balance when the
minttransaction completes.- Navigate to the Read Contract tab
- Find the
balanceOffunction. - Enter the
senderaddress in theaccountfield - Click Query
-
⑥ Run the script
In your terminal, run npm run dev. Your output should look something like this:
Account address: 0x90583F2C1A3b35552fCAc8DB672e064E4B58944A
Signed UserOperation: {
  sender: '0x90583F2C1A3b35552fCAc8DB672e064E4B58944A',
  nonce: '0x3a',
  initCode: '0x',
  callData: '0x18dfb3c7000000000000000000000000000000000000000000000000000000000000004000000000000000000000000000000000000000000000000000000000000000a000000000000000000000000000000000000000000000000000000000000000020000000000000000000000003870419ba2bbf0127060bcb37f69a1b1c090992b0000000000000000000000003870419ba2bbf0127060bcb37f69a1b1c090992b0000000000000000000000000000000000000000000000000000000000000002000000000000000000000000000000000000000000000000000000000000004000000000000000000000000000000000000000000000000000000000000000c00000000000000000000000000000000000000000000000000000000000000044095ea7b3000000000000000000000000e93eca6595fe94091dc1af46aac2a8b5d79907700000000000000000000000000000000000000000000000000000000000989680000000000000000000000000000000000000000000000000000000000000000000000000000000000000000000000000000000000000000000000044a9059cbb00000000000000000000000090583f2c1a3b35552fcac8db672e064e4b58944a000000000000000000000000000000000000000000000000000000000000000000000000000000000000000000000000000000000000000000000000',
  callGasLimit: '0xde17',
  verificationGasLimit: '0x13ab5',
  preVerificationGas: '0xd898',
  maxFeePerGas: '0x42e2440f5',
  maxPriorityFeePerGas: '0x21',
  paymasterAndData: '0xe93eca6595fe94091dc1af46aac2a8b5d799077000000000000000000000000000000000000000000000000000000000654e9b8900000000000000000000000000000000000000000000000000000000000000000000000000000000000000003870419ba2bbf0127060bcb37f69a1b1c090992b000000000000000000000000000000000000000000000000000000007c75667a77115a8a2f94e7bd2be3ca66faa1f17594a80e48d8a89be9f84eb7766f080f740e55d945c921ff3764d7247de5c041d047662b8f0768ff035affecf82561812d1b',
  signature: '0x8083fb7b6c9d5db5d2738fb9e15087364c727a4fd3b270c423aa6b8e906222ec35c5fe11857af619e7540b0d4a41d1bee0872b9868303f159b06c3d0fd3e347b1c'
}
UserOpHash: 0x76afd00873cfac153699b084a14c8d893a287e7131ca13e22a31c0da48ecac99
Waiting for transaction...
Transaction hash: 0x31f30973c44fcea4dc2f5a7e1a7ecc33ee6e36a013f660619011b9c0baedc0fb
View here: https://jiffyscan.xyz/userOpHash/0x76afd00873cfac153699b084a14c8d893a287e7131ca13e22a31c0da48ecac99
Public RPCs tend to be slow
If you are using the default public bundler URL, it may take you longer to get your transaction on-chain.
What's next?
Updated 8 months ago